

GoDaddy is an affordable host that’s commonly relied upon for small businesses needs. Economy packages are great for hosting websites, web applications, email, and other services though (at the time of writing) Dynamic DNS capabilities are unfortunately not offered directly.
What is Dynamic DNS?
Generally unless you’re paying extra for a Static-IP address at your home or office your Internet Service Provider will assign you a dynamic IP address. Dynamic IP addresses can make it tough for you to access devices from your home or office remotely (e.g. workstations, printers, file servers, etc).
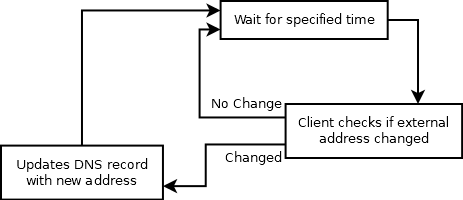
If you have a need to access these devices, either a Static-IP, or Dynamic DNS is required. Dynamic DNS relies on a device in your network notifying the DNS server that your external IP has changed and having it update the DNS record to point to your new external IP address.
The basic process for most Dynamic DNS systems is shown below.
Requirements
A GoDaddy domain name, and an internal device to act as a client (i.e. server, workstation computer, router) to be used for updating the GoDaddy DNS records.
Creating the DNS Record
The first thing we need to do is create the new DNS record.
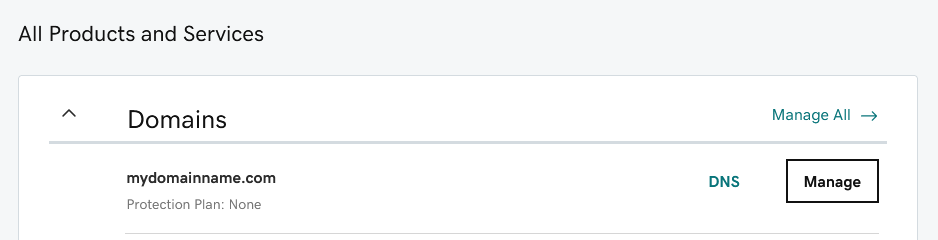
Login to GoDaddy and navigate to the “All Products and Services” section. Then Click “DNS”. If you have multiple domain names ensure that you are working with the correct one.
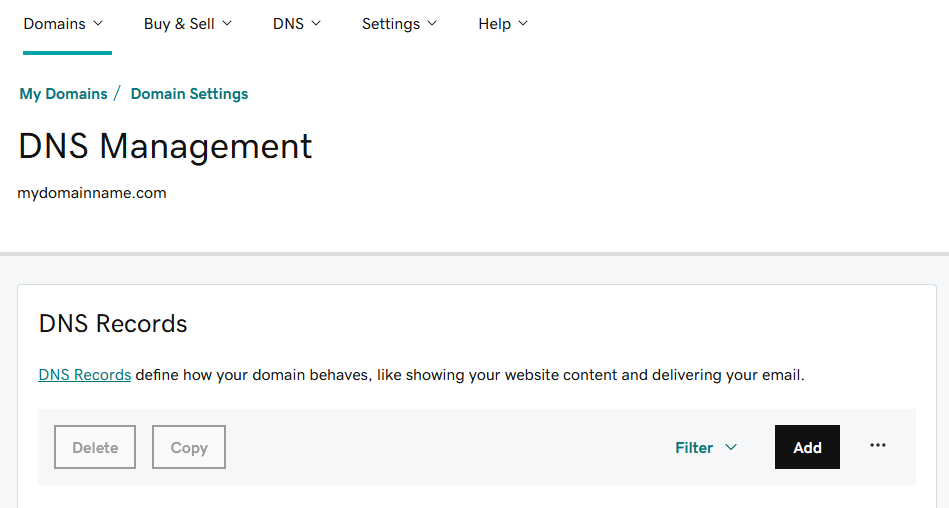
Click “Add” to create a new DNS record.

Fill the record in like above. The type must be “A”. The “Name” will be the subdomain you will use, this can be changed as desired (e.g. gateway, office, etc). Fill the value as “0.0.0.0”, this will be changed once we link our Dynamic DNS client. Set the “TTL” to either “1 Hour” as shown, or “1/2 Hour”. Longer times will result in a lapse of service when your Dynamic IP address changes.
Creating our GoDaddy API Key
Now we will create the API key that our client will use to securely connect to GoDaddy to update the DNS.
Navigate to: https://developer.godaddy.com/keys

Click “Create New API Key” to begin creating your key.
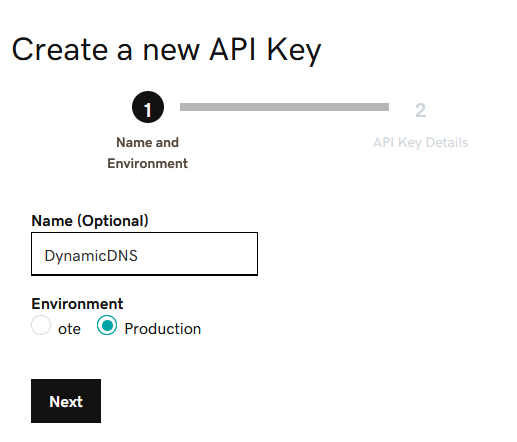
It’s a good idea to name the key something unique and identifiable. For the “Environment” select “Production” then click “Next”.

The API Key and Secret will then be shown. Be sure to copy these before moving on, the secret can’t be recovered after this. (If you lose your secret you must generate a new API Key).
Connecting your Client
Now that the DNS record is created, and we have generated an API Key we are able to setup our client.
This will depend on the hardware that you have available some routers/firewalls have a preset offered for GoDaddy under dynamic DNS options. There are alternatives if you do not have a device that supports GoDaddy directly
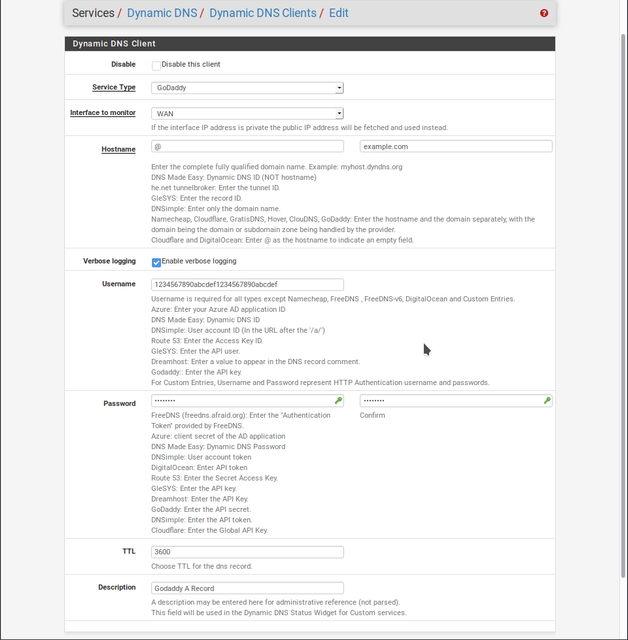
Navigate to your router or firewalls configuration webpage and search for “Dynamic DNS” or “DDNS” options. If your device has a Dynamic DNS option for GoDaddy it will most likely look similar to the above (PFSense shown). Use the API Key generated previously as the Username, and the Secret for the password.
If your device doesn’t support GoDaddy, or doesn’t have Dynamic DNS options continue below. Scripts are provided for both Windows and Linux devices, these may be run on a workstation (preferably one that is always on) or a server.
PowerShell script (Windows):
$mydomain = "mydomainname.com"
$myhostname = "mysubdomain"
$gdapikey = "apikey:keysecret"

$myip = Invoke-RestMethod -Uri "https://api.ipify.org"
$dnsdata = Invoke-RestMethod "https://api.godaddy.com/v1/domains/$($mydomain)/records/A/$($myhostname)" -Headers @{ Authorization = "sso-key $($gdapikey)" }
$gdip = $dnsdata.data
Write-Output "$(Get-Date -Format 'u') - Current External IP is $($myip), GoDaddy DNS IP is $($gdip)"

If ( $gpid -ne $myip) {
  Write-Output "IP has changed: Updating on GoDaddy"
  Invoke-RestMethod -Method PUT -Uri "https://api.godaddy.com/v1/domains/$($mydomain)/records/A/$($myhostname)" -Headers @{ Authorization = "sso-key $($gdapikey)" } -ContentType "application/json" -Body "[{`"data`": `"$($myip)`"}]";
}
Save the above script as “dnsupdater.ps1”. Replacing “mydomainname.com” with your domain, “mysubdomain” with the subdomain set previously, and “apikey:keysecret” with your generated API Key and Secret values. Ensure these are separated by a colon.
Running this script will result in the GoDaddy DNS record being updated to your current IP address. Run this at regular intervals of between 10 and 30 minutes using Task Scheduler to ensure that your DNS is always up to date.
Bash script (Linux):
#!/bin/bash

mydomain="mydomainname.com"
myhostname="mysubdomain"
gdapikey="apikey:keysecret"
logdest="local7.info"

myip=`curl -s "https://api.ipify.org"`
dnsdata=`curl -s -X GET -H "Authorization: sso-key ${gdapikey}" "https://api.godaddy.com/v1/domains/${mydomain}/records/A/${myhostname}"`
gdip=`echo $dnsdata | cut -d ',' -f 1 | tr -d '"' | cut -d ":" -f 2`
echo "`date '+%Y-%m-%d %H:%M:%S'` - Current External IP is $myip, GoDaddy DNS IP is $gdip"

if [ "$gdip" != "$myip" -a "$myip" != "" ]; then
  echo "IP has changed: Updating on GoDaddy"
  curl -s -X PUT "https://api.godaddy.com/v1/domains/${mydomain}/records/A/${myhostname}" -H "Authorization: sso-key ${gdapikey}" -H "Content-Type: application/json" -d "[{\"data\": \"${myip}\"}]"
  logger -p $logdest "Changed IP on ${hostname}.${mydomain} from ${gdip} to ${myip}"
fi
Save the above script as “dnsupdater.sh”. Replacing “mydomainname.com” with your domain, “mysubdomain” with the subdomain set previously, and “apikey:keysecret” with your generated API Key and Secret values. Ensure these are separated by a colon.
Run the script to update the record and confirm that it is configured correctly. We can schedule this script to run at regular intervals using Cron.
To create a Cron job use:
user@machine:~ $ crontab -e Within the cron file add the following line:
*/30 * * * * /full/path/to/file/dnsupdater.sh > /dev/null Replace the “30” as desired with your time in minutes. For additional output “/dev/null” can be replace with “dnsupdate.log”, this file will log the last execution.
Credits
Thanks to Tod-SoS on Instructables for the above Bash script and Powershell script (https://www.instructables.com/Quick-and-Dirty-Dynamic-DNS-Using-GoDaddy/)
Thanks to smcconnell on the netgate forms for the PFSense screenshot (https://forum.netgate.com/topic/142130/godaddy-dynamic-dns-guide)
Leave a Reply
You must be logged in to post a comment.